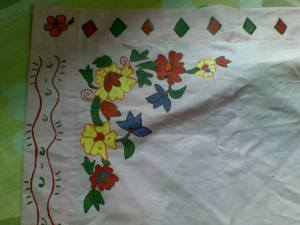
Fabric painting is a kind of creation on it own. You can paint almost any kind of fabric if you know the right way. Creation of sheets / napkins / tissues / covers are something that is really intricate and exhilirating.
With a small elementy of color and imagination , a few colours and a suitable brush, fabric painting opens up endless opportunities for transforming your wardrobe and your home.
You can create one-of-a-kind pieces of wearable art (t-shirts and denims ) or to design/create some special covers ( personalized ) , curtains, or a wall hanging / sheets ..thus giving ur home a new dimension.
Here is the method . .I have created a table cover on order :D..custom made as they say ha ha …
Materials Required .
1. Fabric colors ( shine ones )
2. Black Color Acrylic
3. Carbon Sheet
4. Cotton Cloth of your size and color.
5. Glitter.
Method.
1. Stich the edges / border of the fabric by atleast an inch. This gives weight at the end / corners and prevent
the fabric from flying away due to air when laid on the table.
2. Draw the design on paper and then trace it on to the fabric with the help of the carbon sheet.
3. Color the trace with your favourite colors and allow it to try.
4. Border it black to enhance the painting.
5. After drying , you should do reverse to allow the paint to settle into the fabric.
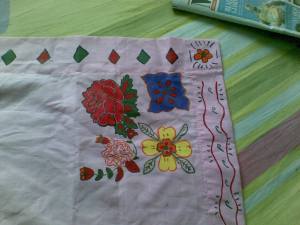
Here ‘s another piece ready :))
Bluntly painting the fabric does not gud , though it will still look good , there are different shading options covered under shading topic. You may use many of these shading/ coloring options to paint the fabric addinf an extra glow and niche to your piece of art 🙂
Cautions during Fabric Painting.
1. Prefer Cotton.
cotton is considered as best fabric for painting. It allows the color to settle in easily since its an absorbent unlike silk fabrics but there are chemical solutions easily available in the market to achieve this. Before begininng you should ideally try painting a small area and see if the fabric spreads.
2. Tight Fabric
Loose fabric and dull the design and not give a proper finish. You may use wooded tightner blocks / rings ones used for knitting purpose to stiff the designated areas.
If a fabric is loosely woven, paint tends to seep through the treads before it’s dry. This tends to reduce the intensity of the colours. A finely woven fabric is also easier to paint detail on than a loosely woven one.
3. Prewash or Not to Prewash?
The reason for prewashing fabric before painting on it is to remove any sizing added during manufacture which may prevent the paint from adhering to the surface. It also gives it a chance to shrink, if it’s going to.
To test whether a piece of fabric really needs prewashing, drop a little bit of water on it.
If it beads up on the surface, it needs washing. If it sinks in, so should paint. If you wash it donot use fabric softner , it reverses the purpose 😀
4. Iron it well
Iron the fabric well and patiently. doing it loosely will hamper the show. Donot iron it with front up , the colors will stick to the hot iron. Do it on the reverse side. If doing from the front , use a layered cloth on the top.
5. Should you add water to acrylic colors.
Adding a tinge of water does no harm and helps smooth flow of colors. Dont add excess water , it will force the colors to spread on the fabric. It should be damp and not soaking tissue 🙂
6. Backdrop sheet
Dont forget to add a newspaper sheet underneath the cloth you paint. It will absorb the excess colors and prevent it from getting applied to the second layer of cloth ( in case of thsrt) or the table where you place it.
7. Manner to paint.
You should insure all the pores of the cloth get filled , you may hold it against the light and see where the pores are open.


